Zephyr笔记2 - 在STM32F429上运行HelloWorld
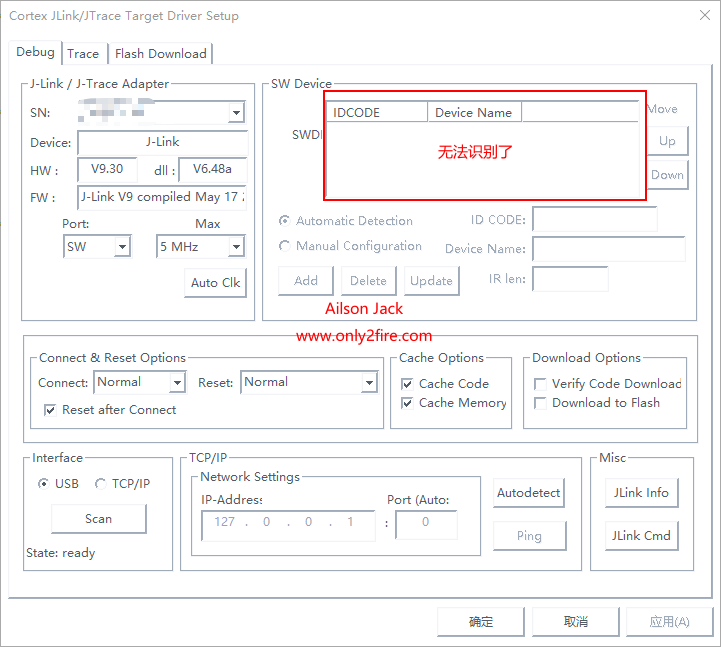
<p style="text-indent: 2em;">Zephyr版本号:<span style="color: rgb(255, 0, 0);">2.2.0</span></p><p style="text-indent: 2em;">开发板:<span style="color: rgb(255, 0, 0);">STM32F429IGT6(野火STM32F429挑战者 V2开发板)</span></p><p style="text-indent: 2em;">开发环境:<span style="color: rgb(255, 0, 0);">Windows 7 64位</span></p><p style="text-indent: 2em;">这里选择的是Zephyr当前最新的Release版本2.2.0进行说明的。</p><p class="artical_littlestyle1">1、修改代码</p><p style="text-indent: 2em;">前面文章的操作,虽然在Windows下能够成功的编译STM32F429的工程,但是却不能在野火挑战者V2开发板上运行,因为Zephyr代码中的STM32F429硬件和野火的外围硬件不一样(其实CPU也有一些差异)。主要体现在外部晶振,时钟的配置以及MPU上面(野火挑战者V2开发板使用的CPU是STM32F429IGT6,不带MPU功能)。</p><p style="text-indent: 2em;">进入到<span style="color: rgb(0, 112, 192);">boards/arm/stm32f429i_disc1</span>文件夹中,然后修改文件<span style="color: rgb(255, 0, 0);">stm32f429i_disc1_defconfig</span>,需要修改的内容如下:</p><p><span style="color: rgb(0, 112, 192);">CONFIG_SYS_CLOCK_HW_CYCLES_PER_SEC=</span><span style="color: rgb(255, 0, 0);">180000000</span></p><p><span style="color: rgb(0, 112, 192);">CONFIG_ARM_MPU=</span><span style="color: rgb(255, 0, 0);">n</span></p><p><span style="color: rgb(0, 112, 192);">CONFIG_CLOCK_STM32_HSE_CLOCK=</span><span style="color: rgb(255, 0, 0);">25000000</span></p><p><span style="color: rgb(0, 112, 192);">CONFIG_CLOCK_STM32_PLL_M_DIVISOR=</span><span style="color: rgb(255, 0, 0);">25</span></p><p><span style="color: rgb(0, 112, 192);">CONFIG_CLOCK_STM32_PLL_N_MULTIPLIER=</span><span style="color: rgb(255, 0, 0);">360</span></p><p style="text-indent: 2em;">在<span style="color: rgb(255, 0, 0);">stm32f429i_disc1_defconfig</span>文件的末尾,添加如下的内容(该内容的含义是编译出的代码不进行优化,这样便于调试):</p><p><span style="color: rgb(0, 112, 192);">CONFIG_NO_OPTIMIZATIONS=y</span></p><p style="text-indent: 2em;">修改文件<span style="color: rgb(255, 0, 0);">board.cmake</span>,需要修改的内容如下:</p><p><span style="color: rgb(0, 112, 192);">board_runner_args(jlink "--device=<span style="color: rgb(255, 0, 0);">STM32F429IG</span>" "--speed=4000")</span></p><p class="artical_littlestyle2">2、编译HelloWorld应用</p><p style="text-indent: 2em;">确定命令提示符的路径在Zephyr2.2.0源代码目录中,执行下述命令:</p><p><span style="color: rgb(0, 112, 192);">west build -p auto -b stm32f429i_disc1 samples/hello_world</span></p><p style="text-indent: 2em;">编译成功的输出信息如下:</p><p style="text-align:center"><img src="/uploads/AilsonJack/2020.05.15/1589549538670261.png" onclick="preview_image('/uploads/AilsonJack/2020.05.15/1589549538670261.png')"/></p><p class="artical_littlestyle3">3、下载程序到开发板</p><p style="text-indent: 2em;">确保Windows中安装了JLink驱动,并且将JLink驱动的路径(JLink.exe所在的路径)添加到系统环境变量的Path中。我这里安装的是Jlink V6.48a,其路径为:<span style="color: rgb(0, 112, 192);">C:\Program Files (x86)\SEGGER\JLink_V648a</span>。</p><p style="text-indent: 2em;">如果没有将JLink驱动的路径添加到环境变量中,下载程序时会出现类似的错误:<span style="color: rgb(255, 0, 0);">FATAL ERROR: required program JLink.exe not found; install it or add its location to PATH</span>。</p><p style="text-indent: 2em;">将开发板上电,连接好JLink调试器,连接好串口线并且打开串口调试助手,然后执行下述命令将程序烧写到开发板中:</p><p><span style="color: rgb(0, 112, 192);">west flash --runner jlink</span></p><p style="text-indent: 2em;">程序下载成功之后,会在串口调试助手中打印出信息,如下图所示:</p><p style="text-align:center"><img src="/uploads/AilsonJack/2020.05.15/1589549538485814.png" onclick="preview_image('/uploads/AilsonJack/2020.05.15/1589549538485814.png')"/></p><p class="artical_littlestyle4">4、使用GDB调试程序</p><p style="text-indent: 2em;">程序下载成功之后,执行命令:<span style="color: rgb(0, 112, 192);">west debug --runner jlink</span>(该命令会自动打开JLink GDB Server,不需要提前手动打开JLink GDB Server),可以使用GDB调试Zephyr,先前的镜像不能成功打印信息,我也是通过这个命令来调试Zephyr,最终定位时钟参数问题的。</p><p style="text-align:center"><img src="/uploads/AilsonJack/2020.05.15/1589549539666941.png" onclick="preview_image('/uploads/AilsonJack/2020.05.15/1589549539666941.png')"/></p><p style="text-indent: 2em;">接下来的一篇文章,会讲述如何使用Eclipse来调试Zephyr,虽然也是使用的GDB,但是调试更加的方便,能够手动添加断点,添加观察的变量,随意切换文件,总之下面一篇文章很OK,敬请关注。</p><p style="text-indent: 2em;">如果这篇文章对你有帮助,记得点赞和关注博主就行了^_^。</p>
你可能也喜欢:


本文共 2 个回复 

阿翔天明


 :
您好,我在编译stm32的板子的时候,都出现了类似st/f4/stm32f429zitx-pinctrl.dtsi 文件缺失的告警,在github上也并未找到该文件,请问这个文件在哪个地方可以下载到啊?
:
您好,我在编译stm32的板子的时候,都出现了类似st/f4/stm32f429zitx-pinctrl.dtsi 文件缺失的告警,在github上也并未找到该文件,请问这个文件在哪个地方可以下载到啊?
:
您好,我在编译stm32的板子的时候,都出现了类似st/f4/stm32f429zitx-pinctrl.dtsi 文件缺失的告警,在github上也并未找到该文件,请问这个文件在哪个地方可以下载到啊?1楼 2021年06月02日 22:14:35 回复
AilsonJack
 :
不好意思,最近忙没有看到消息。好像确实没有stm32f429zitx-pinctrl.dtsi这个文件,或者你直接使用文章提及的board stm32f429i_disc1进行修改吧,这样快些。
:
不好意思,最近忙没有看到消息。好像确实没有stm32f429zitx-pinctrl.dtsi这个文件,或者你直接使用文章提及的board stm32f429i_disc1进行修改吧,这样快些。
:
不好意思,最近忙没有看到消息。好像确实没有stm32f429zitx-pinctrl.dtsi这个文件,或者你直接使用文章提及的board stm32f429i_disc1进行修改吧,这样快些。2021年06月26日 17:32:34 回复
发表评论
![]()
![]()
![]()
![]()
![]()
![]()
![]()
![]()
![]()
![]()
![]()
![]()
![]()
![]()
![]()
![]()
![]()
![]()
![]()
![]()
![]()
![]()
JLink V9掉固件修复(灯不亮) 3Zephyr笔记2 - 在STM32F429上运行HelloWorld 2计算NandFlash要传入的行地址和列地址 1Linux MMC子系统 - 6.eMMC 5.1工作模式-设备识别模式 0Linux MMC子系统 - 5.eMMC 5.1工作模式-引导模式 0Linux MMC子系统 - 4.eMMC 5.1常用命令说明(2) 0
标签云
Linux嵌入式实用技巧ARM内核学习问题集合CC++编程语言阅读笔记汇编Linux内核完全注释Windows驱动开发计算机基础ARM11ARMv7-ASTM32IDESublimeLinux内核学习eMMCMMC子系统Ubuntu操作系统OfficeVMWareAPUEgccRTOS中断漫游世界随笔感悟开发工具软件应用编程VsCodearmccarmclang编译器ZephyrSPIJLink网卡驱动安装各种芯片库函数NFSμCOS内核sambaFlashUnix命令与脚本输入法Linux内核设计与实现gitRIFFWAVJATGFTPar8161安装centos有线上网μCGUI字库工程建立右键菜单网络文件系统Firefox百度NTFS文件系统CodeBlocksCentOS数据结构算法PhotoShop51KeilQTUltraEditscanfglibc宏定义UIDGID优先级娱乐天地SourceInsight磁盘扇区总线I2CPDFBComparePythonI2SFPUMakefileSWDCPUARP软件推荐FileZilla