Linux编程-pthread_barrier_xxx介绍
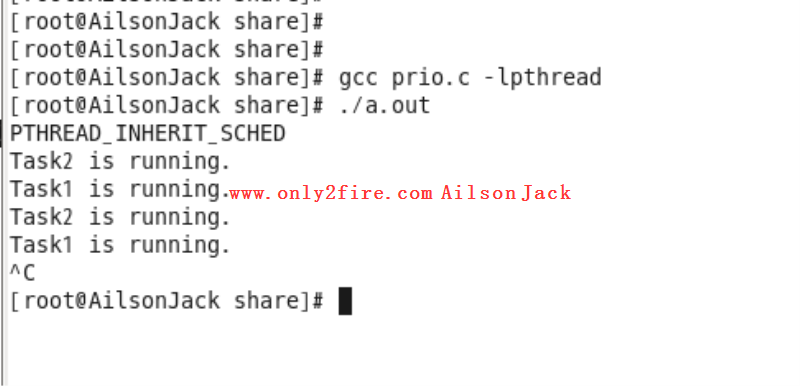
<p style="text-indent: 2em;">pthread_barrier_xxx系列函数在<pthread.h>中定义,用于多线程的同步,它包含下列三个函数:<br/></p><p style="text-indent: 2em;"><span style="color: rgb(0, 112, 192);">—pthread_barrier_init();<br/></span></p><p style="text-indent: 2em;"><span style="color: rgb(0, 112, 192);">—pthread_barrier_wait();<br/></span></p><p style="text-indent: 2em;"><span style="color: rgb(0, 112, 192);">—pthread_barrier_destroy();</span><br/></p><p style="text-indent: 2em;">那么pthread_barrier_xxx是用来做什么的?这三个函数又怎么配合使用呢?<br/></p><p style="text-indent: 2em;">pthread_barrier_xxx其实只做且只能做一件事,就是充当栏杆(barrier意为栏杆)形象的说就是把先后到达的多个线程挡在同一栏杆前,直到所有线程到齐,然后撤下栏杆同时放行。<br/></p><p style="text-indent: 2em;"><span style="background-color: rgb(118, 146, 60);">1)、</span>init函数负责指定要等待的线程个数;<br/></p><p style="text-indent: 2em;"><span style="background-color: rgb(118, 146, 60);">2)、</span>wait()函数由每个线程主动调用,它告诉栏杆“我到起跑线前了”。wait()执行末尾栏杆会检查是否所有人都到栏杆前了,如果是,栏杆就消失所有线程继续执行下一句代码;如果不是,则所有已到wait()的线程停在该函数不动,剩下没执行到wait()的线程继续执行;<br/></p><p style="text-indent: 2em;"><span style="background-color: rgb(118, 146, 60);">3)、</span>destroy函数释放init申请的资源。</p><p class="artical_littlestyle1">1、函数原型</p><p style="text-indent: 0em;"><span style="color: rgb(0, 112, 192);">#include <pthread.h><br/>int pthread_barrier_init(pthread_barrier_t *restrict barrier, const pthread_barrierattr_t *restrict attr, unsigned count);<br/>int pthread_barrier_wait(pthread_barrier_t *barrier);<br/>int pthread_barrier_destroy(pthread_barrier_t *barrier);</span><br/></p><p style="text-indent: 2em;">参数解释:<br/><span style="color: rgb(0, 112, 192);">pthread_barrier_t</span>:是一个计数锁,对该锁的操作都包含在三个函数内部,我们不用关心也无法直接操作,只需要实例化一个对象丢给它就好。<br/><span style="color: rgb(0, 112, 192);">pthread_barrierattr_t</span>:锁的属性设置,设为NULL让函数使用默认属性即可。<br/><span style="color: rgb(0, 112, 192);">count</span>:你要指定的等待个数。</p><p class="artical_littlestyle2">2、使用场景</p><p style="text-indent: 2em;">这种“栏杆”机制最大的特点就是最后一个执行wait的动作最为重要,就像赛跑时的起跑枪一样,它来之前所有人都必须等着。所以实际使用中,pthread_barrier_xxx常常用来让所有线程等待“起跑枪”响起后再一起行动。比如我们可以用pthread_create()生成100个线程,每个子线程在被create出的瞬间就会自顾自的立刻进入回调函数运行。但我们可能不希望它们这样做,因为这时主进程还没准备好,和它们一起配合的其它线程还没准备好,我们希望它们在回调函数中申请完线程空间、初始化后停下来,一起等待主进程释放一个“开始”信号,然后所有线程再开始执行业务逻辑代码。<br/></p><p style="text-indent: 2em;">为了解决上述场景问题,我们可以在init时指定n+1个等待,其中n是线程数。而在每个线程执行函数的首部调用wait()。这样100个pthread_create()结束后所有线程都停下来等待最后一个wait()函数被调用。这个wait()由主进程在它觉得合适的时候调用就好。最后这个wait()就是鸣响的起跑枪。</p><p class="artical_littlestyle3">3、程序示例</p><p style="text-indent: 2em;">下面的程序,在main函数中,<span style="color: rgb(0, 112, 192);">pthread_barrier_init()</span>指定2+1个等待,接着创建了2个线程,然后主进程延时6秒,之后调用<span style="color: rgb(0, 112, 192);">pthread_barrier_wait()</span>来让线程接着运行,程序如下:</p><pre class="brush:cpp;toolbar:false PrismJs">/*
********************************************************************************
*描述:pthread_barrier_xxx程序示例
*Use:gcc pthread_barrier_xxx.c -lpthread
* ./a.out
*By:Ailson Jack
*Date:2016.03.24
*Blog:www.only2fire.com
********************************************************************************
*/
#include <stdio.h>
#include <unistd.h>
#include <pthread.h>
#include <time.h>
pthread_barrier_t barrier;
void *Task1(void *arg);
void *Task2(void *arg);
int main(void)
{
int policy,inher;
pthread_t tid;
pthread_attr_t attr;
struct sched_param param;
//初始化线程属性
pthread_attr_init(&attr);
pthread_barrier_init(&barrier,NULL,2 + 1);//2+1个等待
//创建线程1
pthread_create(&tid, &attr,Task1,NULL);
//创建线程2
pthread_create(&tid, &attr,Task2,NULL);
printf("main process will sleep 6s.\r\n");
sleep(6);/*等待6s后,才让线程运行*/
pthread_barrier_wait(&barrier);//起跑枪“砰!”
pthread_join(tid, NULL);
pthread_barrier_destroy(&barrier);
}
void *Task1(void *arg)
{
printf("Task1 will be blocked.\r\n");
pthread_barrier_wait(&barrier);//所有线程都被阻塞在这里
printf("Task1 is running.\r\n");
sleep(3);//延时3s
pthread_exit(NULL);
}
void *Task2(void *arg)
{
printf("Task2 will be blocked.\r\n");
pthread_barrier_wait(&barrier);//所有线程都被阻塞在这里
printf("Task2 is running.\r\n");
sleep(3);//延时3s
pthread_exit(NULL);
}</pre><p style="text-indent: 2em;">程序的运行结果如下图所示:</p><p style="text-align: center;"><img src="/uploads/AilsonJack/2018.08.25/1535207799161323.png" onclick="preview_image('/uploads/AilsonJack/2018.08.25/1535207799161323.png')"/></p>
你可能也喜欢:


暂无评论,要不要来个沙发
发表评论
![]()
![]()
![]()
![]()
![]()
![]()
![]()
![]()
![]()
![]()
![]()
![]()
![]()
![]()
![]()
![]()
![]()
![]()
![]()
![]()
![]()
![]()
JLink V9掉固件修复(灯不亮) 3Zephyr笔记2 - 在STM32F429上运行HelloWorld 2计算NandFlash要传入的行地址和列地址 1Linux MMC子系统 - 6.eMMC 5.1工作模式-设备识别模式 0Linux MMC子系统 - 5.eMMC 5.1工作模式-引导模式 0Linux MMC子系统 - 4.eMMC 5.1常用命令说明(2) 0
标签云
Linux嵌入式实用技巧ARM内核学习问题集合CC++编程语言阅读笔记汇编Linux内核完全注释Windows驱动开发计算机基础ARM11ARMv7-ASTM32IDESublimeLinux内核学习eMMCMMC子系统Ubuntu操作系统OfficeVMWareAPUEgccRTOS中断漫游世界随笔感悟开发工具软件应用编程VsCodearmccarmclang编译器ZephyrSPIJLink网卡驱动安装各种芯片库函数NFSμCOS内核sambaFlashUnix命令与脚本输入法Linux内核设计与实现gitRIFFWAVJATGFTPar8161安装centos有线上网μCGUI字库工程建立右键菜单网络文件系统Firefox百度NTFS文件系统CodeBlocksCentOS数据结构算法PhotoShop51KeilQTUltraEditscanfglibc宏定义UIDGID优先级娱乐天地SourceInsight磁盘扇区总线I2CPDFBComparePythonI2SFPUMakefileSWDCPUARP软件推荐FileZilla